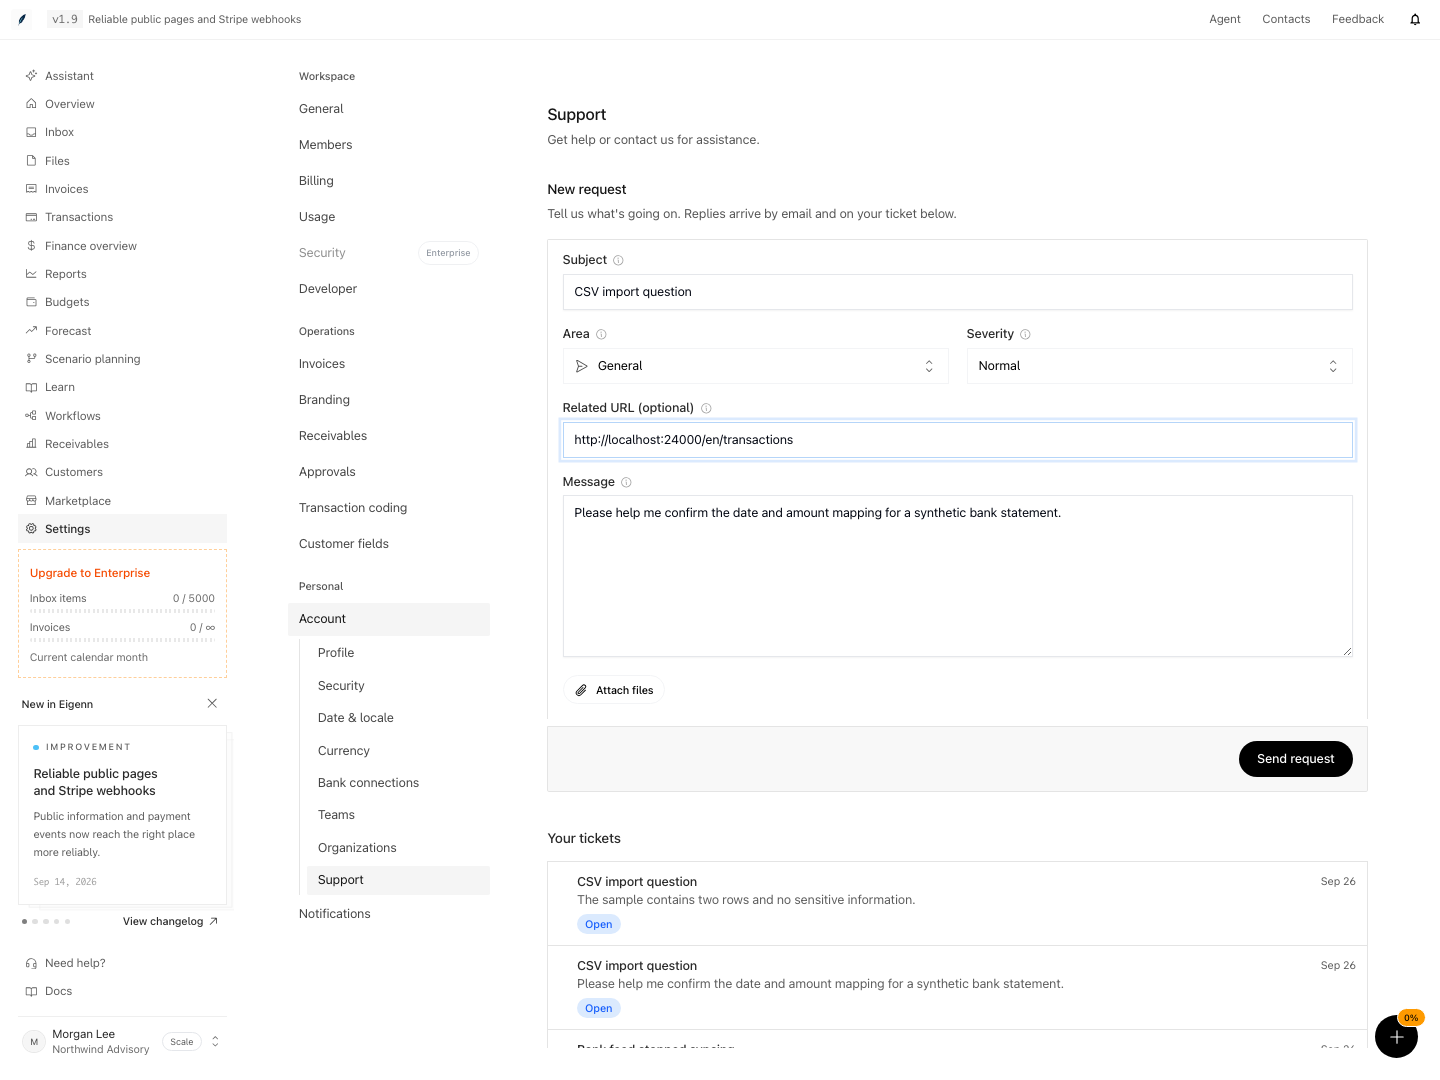
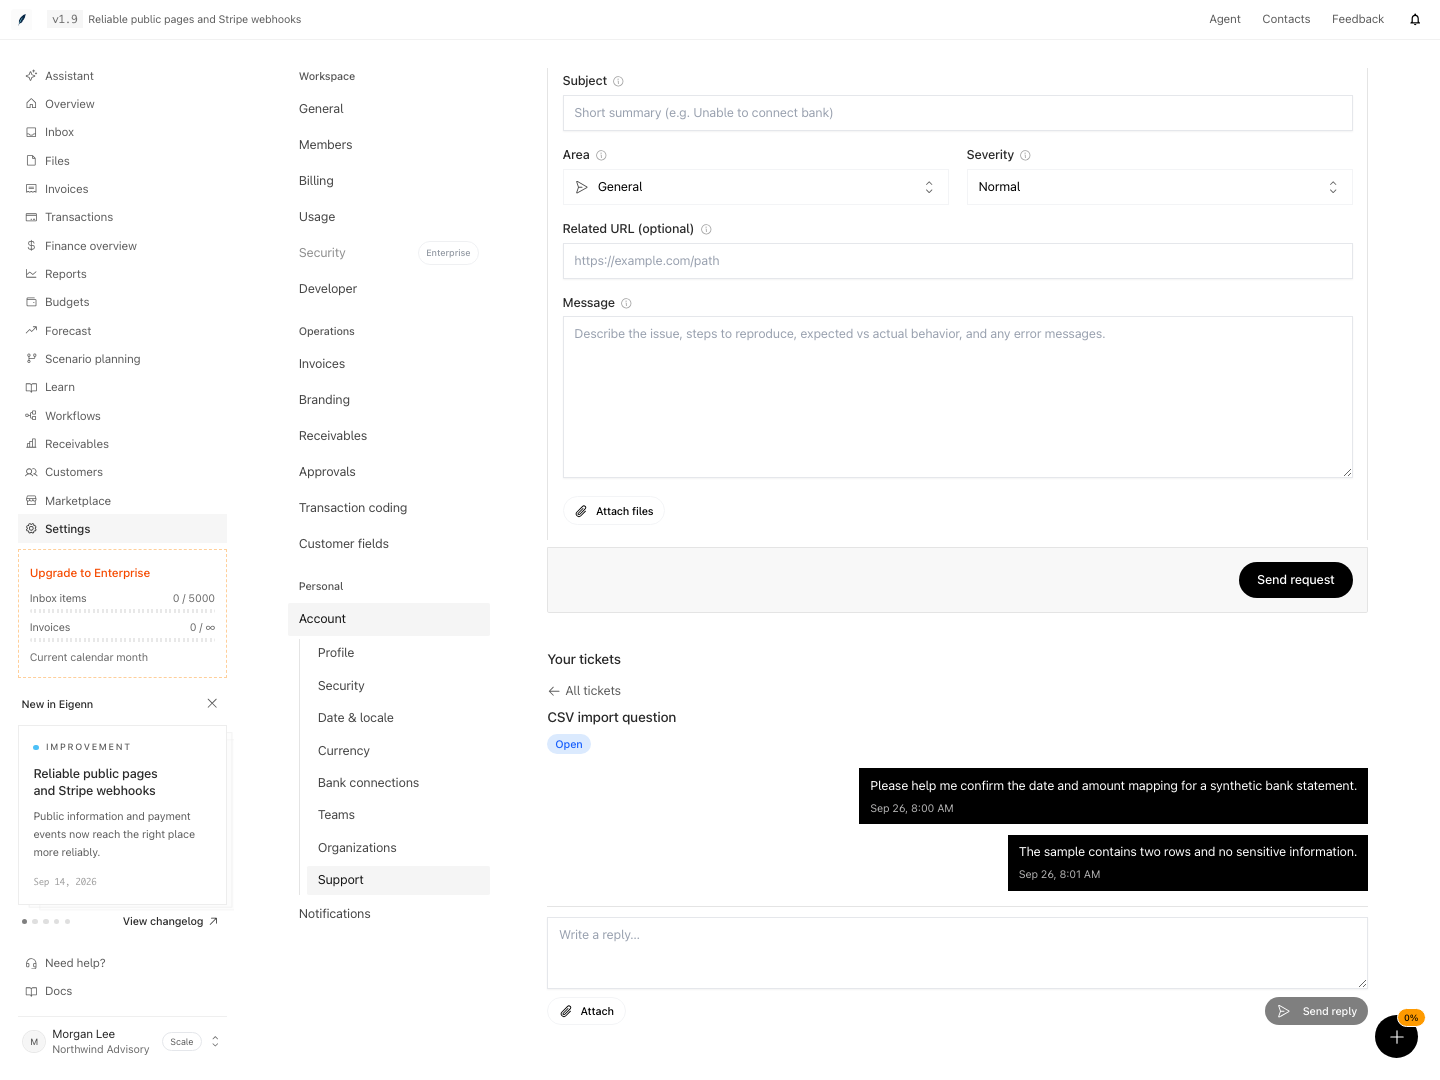
Send a support request from Settings → Account → Support, then reopen the conversation under Your tickets. If you cannot sign in, use the public Contact page.
Capabilities
Create a request with its area, severity, related URL, and supporting details. View your saved tickets and send follow-up messages from the same page. Optional attachments let you include relevant files. Public contact options are available when you cannot sign in.
Prerequisites
Sign in to the intended workspace with a verified email address. Creating requests and sending replies require Owner or Member access and a workspace that permits writes; Viewer access does not permit those actions. The support service must be available.
Review and redact your message and attachments before sending. The form does not replace a check for passwords, secrets, or sensitive customer information.
Concepts
Choose Severity by Impact
Severity is context that helps route the ticket. It is not a response-time guarantee.
Severity
Use it for
Urgent
A production workflow cannot continue, access appears compromised, or more work can create material harm
High
A core workflow fails for many records or users, and there is no reasonable workaround
Normal
A product issue has a workaround or affects a limited workflow
Low
A question, a minor defect, or a request that blocks nothing
Describe the real impact. Your selection of Urgent does not create a documented support SLA in the product.
Include Reproducible Context
For every request, include:
workspace name
affected page URL
what you tried
what you expected
what happened instead
exact error text
time of the event and your timezone
whether the issue is repeatable
Add record-specific context when applicable:
Area
Useful context
Bank or integration
Provider, institution, connection status, last successful sync
Invoice
Invoice number, customer, current status, intended action
Transaction import
Destination account, source date range, file size, mapped columns
Billing
Current plan, checkout or portal action, whether a charge succeeded
Authentication
Sign-in method, workspace domain, redirect or error text; never send a one-time code
API or webhook
Request ID, timestamp, endpoint, status code, event type; redact credentials
Workflow
Open In-App Support
Open Settings.
Select Account.
Select Support in the account navigation.
The in-app form submits a ticket that uses your authenticated email address. It includes these fields:
Field
Description
Subject
Required; at least 3 characters after trimming spaces
Area
Necessary; choose the closest listed support area
Severity
Necessary; Low, Normal, High, or Urgent
Related URL
Optional; must be a valid URL
Message
Necessary; at least 10 characters
Attachments
Optional; add relevant screenshots or files
Paste the affected page address into Related URL. Leave it empty when no page URL applies.
Use Attach files to include relevant screenshots or other related files. Put identifiers and exact error text in the message. Never attach or enter passwords, MFA codes, API secrets, bank credentials, or complete payment-card details.
Choose a Product Area
The current form offers:
Billing & plans
Invoicing
Payments
Integrations
Something looks broken
Feature request
General
Choose General when the issue is about account access, settings, usage, or a product area that is not listed.
The product does not show a separate password-reset page. The hosted identity flow handles authentication recovery. If that flow cannot restore access, use the public contact path. Include the sign-in email and the organization domain, but do not share any secret.
Security-Sensitive Reports
For suspicious access, leaked credentials, or a possible vulnerability:
Stop all use of the leaked credential.
Revoke or rotate the credential at the relevant provider when this is possible.
Preserve timestamps and non-secret evidence.
Use in-app Support if you still have safe access.
If you do not have safe access, use the public Contact page.
Do not delete audit evidence. Do not continue tests against data that you do not own.
After Submission
Select Send request. A successful submission shows Support ticket sent., clears the form, and adds the request to Your tickets below.
Select the saved ticket to open its conversation.
Enter a follow-up in Reply, then select Send reply.
Reopen the ticket after refreshing to see the saved messages.
Select All tickets to return to the list.
A resolved ticket asks you to open a new request. If in-app replies are unavailable, use the displayed Reply by email option. A temporary conversation-loading failure shows a notice; it does not mean the saved ticket was deleted.
If the form shows an error, keep the page open. Copy the message to a safe local note. Then try one more time. Use the public contact path if authenticated submission remains unavailable.
Behavior specification
Situation
What to expect
Subject is shorter than 3 characters, or message is shorter than 10
Validation asks you to complete the field; no request is submitted
Related URL is nonempty but invalid
Correct the URL or clear the field before submitting
Request succeeds
A confirmation appears, the form clears, and the ticket appears under Your tickets
Reply succeeds
The reply field clears and the conversation includes your message
Reply fails
An error appears and your composed reply remains available
Ticket is resolved
Open a new request for further help
Conversation is temporarily unavailable
The saved ticket remains visible with a loading-failure notice
Your tickets shows requests associated with your signed-in identity in the active workspace. A visible form does not grant write permission. Severity describes impact; it does not promise a response time.
Diagrams
Eigenn Support Request Workflow
Rendering diagram…
Screenshots
Shown with synthetic data in a local workspace.
Verification
Open Settings → Account → Support in the intended workspace.
Submit an empty form. Confirm that Subject and Message show validation errors.
Enter a subject and message, then an invalid Related URL. Confirm the URL error; correct or remove it.
Review the message and attachments for secrets. Select Send request and confirm the success message and cleared form.
Refresh the page, open the request under Your tickets, and confirm that the original message is present.
Send a reply. Refresh and reopen the same ticket; confirm that the reply remains visible.
Check that the reply field and send control remain usable on a narrow screen.
If submission or a reply fails, retain your message and use the recovery path above. Do not repeatedly submit the same request without checking Your tickets.