Teams and Organizations
Understand workspace boundaries, member roles, invitations, how to switch teams, and owner-managed identity organizations.
Summary
Eigenn uses teams as workspace and data boundaries. Customers, invoices, transactions, documents, settings, and automation belong to the active team. Membership controls who can read or change that data.
The separate Organizations area holds owner-managed enterprise identity settings such as company domains and single sign-on. An organization links to a team record. Organization ownership and team membership are not interchangeable.
Capabilities
Roles and Access
Eigenn supports three team roles.
| Capability | Owner | Member | Viewer |
|---|---|---|---|
| Read team workspace data | Yes | Yes | Yes |
| Create or change normal team data | Yes | Yes | No |
| View member and pending-invite lists | Yes | Yes | Yes |
| Invite a Member | Yes | Yes | No |
| Invite an Owner | Yes | No | No |
| Remove a pending invite | Yes | Yes | No |
| Change member roles | Yes | No | No |
| Remove members | Yes | No | No |
| Manage workspace settings and billing | Yes | No | No |
| Delete the team | Yes | No | No |
The visible invite form offers Owner and Member. Eigenn can show a Viewer who already has membership. That Viewer keeps read-only access. The current member form does not offer Viewer as an invite or role-change choice.
Some write buttons can remain visible to a Viewer. The access boundary still refuses the request. Treat the role, not button visibility, as authoritative.
Prerequisites
To access team and organization features, a user must have an Eigenn account. For creating organizations, a valid enterprise (non-personal) company domain is required. Only team Owners can perform certain management and destructive actions such as deleting teams or managing billing.
Concepts
Team, Workspace, and Organization
| Term | What it means in Eigenn |
|---|---|
| Team | The membership group and primary data-access boundary |
| Workspace | The active team whose data and settings Eigenn loads now |
| Organization | An owner-scoped enterprise identity record with optional domain, SSO, directory, role, and feature information |
Some screens use team, workspace, and company for the same active data boundary. Always confirm the active team before you change customer, billing, finance, or security data.
The Public badge on the team overview is a display label. It does not make team data publicly accessible. Application data remains membership-scoped.
Destructive Boundaries
- A removed invite stops a future acceptance. It does not affect a current member.
- A removed member loses access to that team. Eigenn does not delete their account.
- When you leave a team, the change affects only your own account.
- Only an Owner can delete a team. The deletion permanently cascades through team data. Eigenn queues the external cleanup after the deletion, on a best-effort basis.
- There is no team archive or restore flow in the current product.
Workflow
Create a Workspace
Select Create team in the team selector. The workspace form asks for:
- company name with at least two characters
- optional organization display name for identity and SSO
- country
- base currency
Team and organization names must be unique without regard to letter case. If the name is already in use, select another name.
After creation, the creator becomes an Owner. The new team becomes active. Eigenn then continues through MFA and onboarding setup. Eigenn provisions the default workspace folders and collections controls in the background. A failure there does not always undo the team creation.
Base currency becomes the company's default for cross-currency views. Check it carefully before you import accounts or create substantial billing history.
Switch and Review Teams
Open Settings → Account → Teams to see every team where your account has membership.
For each team:
- View switches to that workspace and opens its team overview
- Manage appears for Owners, switches to the workspace, and opens Settings
- Leave Team removes your membership after confirmation
The team overview shows the name, plan, base currency, country, creation date, team email and inbox address when available, members, pending invitations, and connected integrations.
The Edit details control on the overview now has no connected edit action. Use Manage and the relevant Settings page for supported changes.
Manage Members
Open Settings → Members.
Team Members
The member list shows each person's name, email, and role. Search now uses the member's name. A search by email alone can fail to filter the list, even though the list shows the email.
Owners can:
- promote a Member to Owner
- demote an Owner to Member when another Owner remains
- remove another member after confirmation
- leave the team when another Owner remains
Members and Viewers see roles as text. They cannot change the roles. The current role selector shows Owner and Member, not Viewer.
Pending Invitations
The pending list shows the invite email and the role that Eigenn grants on acceptance. Search filters by email.
Owners and Members can remove a pending invitation. The menu removes it immediately. There is no confirmation dialog.
Invite People
Select Invite member from either member tab.
- Enter the person's exact sign-in email.
- Choose Member or Owner.
- Select Add more to prepare many invitations.
- Select Send invites.
- Confirm the success message and review Pending Invitations.
Permission rules still apply when the form offers a role:
- Owners can send Owner or Member invitations.
- Members can send Member invitations. Eigenn rejects an Owner invitation from a Member.
- Viewers cannot send invitations.
If you invite the same email to the same team again, Eigenn updates the role and inviter on the pending invite. Eigenn does not create another pending row.
The pending list does not show an expiration date. There is no resend action. To send a new invitation after you correct an address or a delivery problem, remove the old invite. Then create it again.
Accept or Decline an Invitation
Pending invitations for the authenticated email appear in the team selector and under Settings → Account → Teams.
- Accept creates membership with the invited role and consumes the invitation.
- Decline removes the invitation and creates no membership.
Acceptance checks the invitation against the authenticated account's email. Use the exact email address that got the invitation. A user cannot accept an invitation for another email.
If the account already has membership, Eigenn does not add a duplicate membership. Eigenn still consumes the invitation.
Change Roles Safely
Role changes take effect immediately.
An Owner can manage workspace settings, billing, member roles, removals, and team deletion. Know this before you promote a person to Owner.
Before you demote an Owner:
- Confirm that another Owner exists.
- Confirm who will own billing and security work.
- Change the role.
- Refresh the member list.
- Check the result.
The current interface does not let the sole Owner demote themselves. The sole Owner also cannot leave the team.
Leave or Remove Access
Leave a team
Any member can select Leave Team. Eigenn blocks the final Owner until you assign another Owner.
After you leave:
- Eigenn removes the membership
- that account can no longer read or change the workspace
- if the team was active, Eigenn clears the active-team selection
- you need a new invitation to get access again
Remove a member
Only an Owner can remove another member. The action asks for confirmation. It then removes the membership immediately. It does not delete the person's user account or their memberships in other teams.
Check ownership before you remove an Owner. Eigenn has no approval or delay period for a removal.
Manage Enterprise Organizations
Open Settings → Account → Organizations. This list includes each organization where the account is the recorded organization owner. It is not a list of every team where the account has an Owner role.
Create an organization
The form asks for:
- organization name
- company domain
- optional URL slug
The domain must be a valid company domain. Eigenn rejects personal-mail domains such as Gmail, Outlook, Yahoo, iCloud, and Proton. A custom slug must contain lowercase letters, numbers, and hyphens. A custom slug must also have at least two characters. If a slug is already in use, Eigenn generates a suffixed alternative.
When you create an organization, you cannot assign another user as its owner. The authenticated account becomes the recorded owner.
Eigenn tracks organization creation and team membership separately. After creation, check for the new workspace under Settings → Account → Teams. Do this before you look for it in the team switcher.
Check organization status
The organization detail page can show:
- name, slug, creation date, and external identity ID
- SSO status
- domain verification status
- SSO connection count
- verified domains
- SSO connections
- directory-sync connections
- organization roles and permission counts
- identity feature flags
Only the recorded organization owner can load these details by slug. Other members get an organization-not-found response, not a partial enterprise configuration.
Manage domains and SSO
When you set up the enterprise identity integration and Eigenn can generate an admin link:
- Domains → Manage opens domain verification in the external admin portal
- SSO → Configure opens SSO configuration
- Settings → Open admin portal opens the available SSO administration link
These links open a new browser tab. A link can be short-lived. Finish or restart the flow. Do not share the link.
If the integration is not available, the organization still shows basic local details. Domains, SSO connections, directories, roles, feature flags, and admin links are then empty. An empty section is not proof that someone deleted a provider-side object.
Behavior specification
Owners can manage all aspects of a workspace, including member roles and billing, except demoting themselves as sole Owner. Only Owners can delete a team or promote/demote members to or from Owner. Member and Viewer roles offer decreasing levels of access to team data and settings. Organization management is only available to the recorded owner, and certain features may be unavailable if the required enterprise integration is missing.
Diagrams
Rendering diagram…
Screenshots
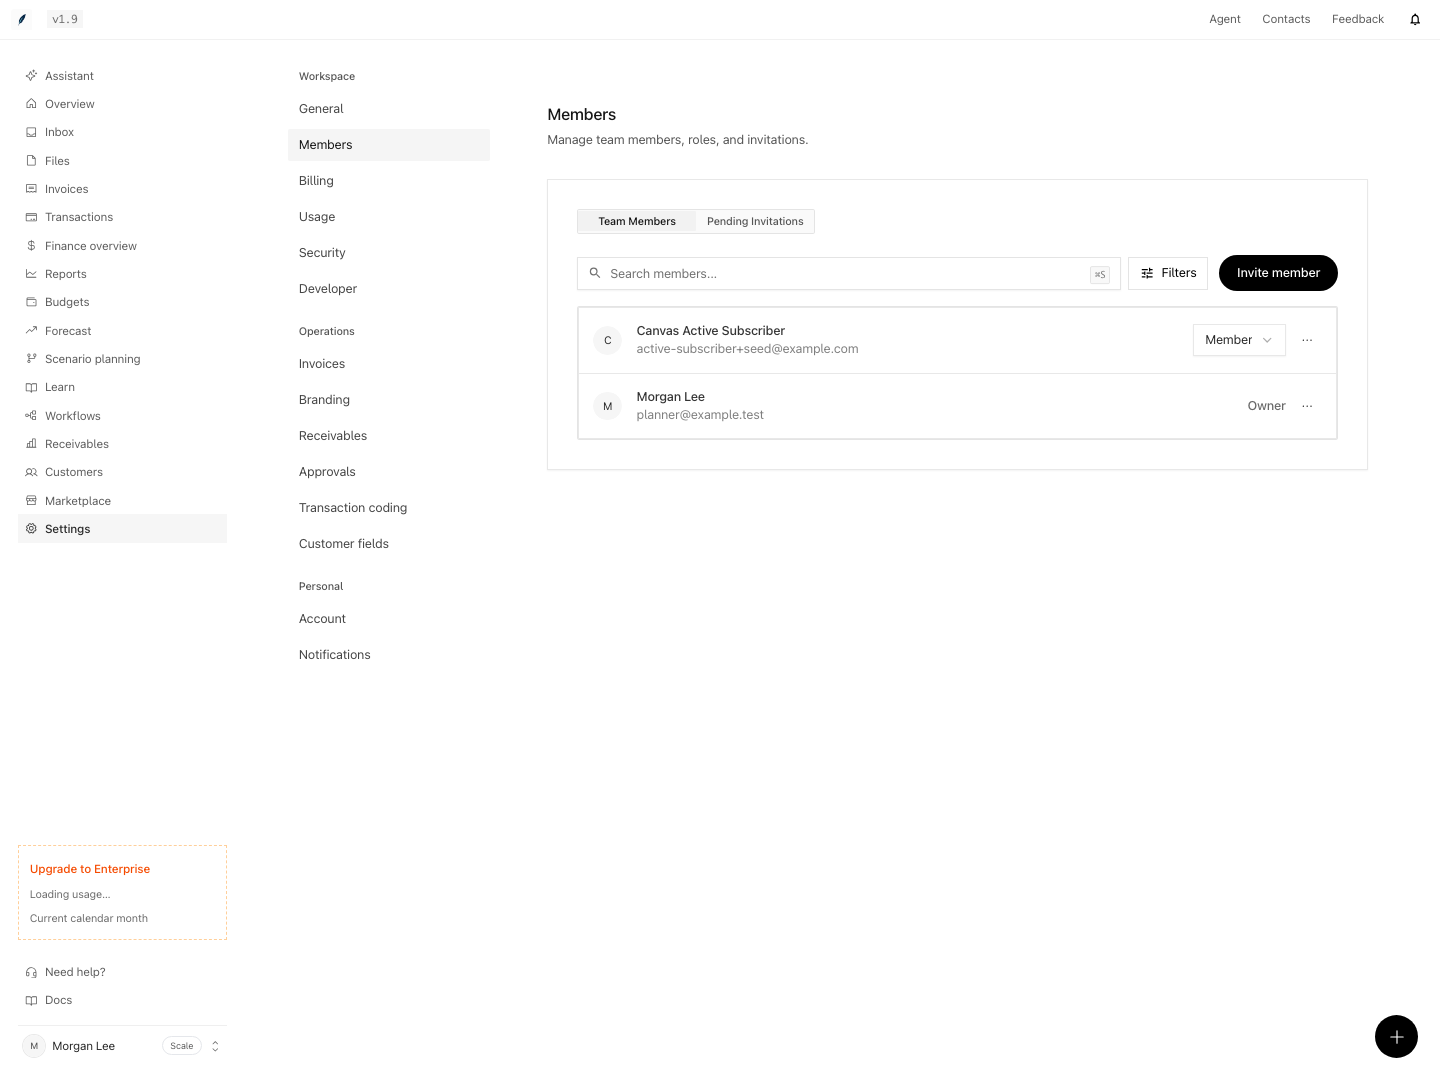
Shown with synthetic data in a local workspace.
Verification
Troubleshoot
I can see Invite member but sending fails
Check your role. Viewers cannot write. Members cannot grant the Owner role. Ask an Owner when the invitation needs Owner access.
A pending invitation is not visible to the recipient
Confirm the exact sign-in email with its letter case. Then remove the invite. Then create it again if necessary. The list has no resend action and no visible expiration.
I cannot change my own role
The sole Owner cannot self-demote. Promote another trusted member to Owner first.
I cannot leave the team
The final Owner must remain. Assign another Owner. Check the role change. Then leave.
A search for members by email returns no result
Search by the member's display name. The member table now filters the name field, even though it shows the email.
The organization has no domain or SSO controls
The enterprise identity integration or the portal link can be unavailable. Basic organization details can exist without provider-backed controls.
An Owner workspace does not appear in Organizations
The Organizations page uses the recorded organization-owner field, not membership role alone. Manage normal workspace membership under Settings → Account → Teams.
- Create a team and confirm that you are listed as Owner and the workspace activates with provided details.
- Invite one or more members, assign them Member or Owner role, and verify their appearance in Pending Invitations.
- Accept an invitation using the exact recipient email and confirm membership is granted.
- Change another member's role as Owner and refresh the list to confirm the role update.
- Attempt to invite or promote a Viewer and confirm the form does not provide the option.
- Remove a member as Owner and confirm the member loses access to workspace data.
- Try to leave the team as the final Owner and confirm Eigenn prevents the action.
- Create an organization as Owner, verify the domain requirement, validate ownership assignment, and check the organization detail page shows identity fields and status.
- Attempt to manage SSO or domain without the required enterprise integration and confirm those sections display as empty or unavailable.