Manage Team Access
Invite teammates, assign roles, check acceptance, switch workspaces, and remove access, but keep at least one owner.
Summary
Use this workflow when you add a teammate, transfer ownership, examine pending invitations, or remove access. Team membership is the boundary for customer, invoice, finance, document, and settings data. Treat a role change as a security change.
Capabilities
Eigenn allows you to: invite teammates to a team, specify their access roles, view and manage pending invitations, accept or decline team invites, change member roles (with limitations), remove members, leave a team, and review access. Owners can manage settings, billing, roles, and team deletion, while Members have write-access and Viewers have read-only access. The system ensures security by restricting role changes and critical actions like removal or demotion, especially for the last Owner.
Prerequisites
Before You Start
- Select the team you intend to manage.
- Open Settings → Members.
- Confirm your own role in Team Members.
- Decide whether the person needs write access or full ownership.
- Have the exact email address they use to sign in.
Concepts
Choose the Right Role
| Role | Use when |
|---|---|
| Owner | The person must manage settings, billing, roles, removals, security, and team deletion |
| Member | The person needs normal read and write access to workspace data |
| Viewer | The person needs read-only access; Eigenn supports current Viewers, but the invite form does not offer this role |
Grant Owner only to people who must control billing and security. Owner access takes effect when the person accepts the invitation or when you change the role.
Workflow
1. Check the Current Ownership
- Select Team Members.
- Search for the current Owners by name.
- Count how many Owners remain.
- Confirm which Owner is responsible for billing and security.
Do this before you demote an Owner, remove an Owner, or ask an Owner to leave. The last Owner cannot leave through the product.
2. Invite One or More People
- Select Invite member.
- Enter the first person's exact sign-in email.
- Choose Member or Owner.
- Select Add more for each other person.
- Check every email and role.
- Select Send invites.
- Confirm that the success message reports the expected invite count.
An Owner can invite Owners or Members. A Member can invite Members, but Eigenn rejects a Member request to grant Owner. A Viewer cannot send invitations.
3. Confirm Pending Invitations
- Select Pending Invitations.
- Search by email.
- Confirm each invitation shows the intended role.
- Open the menu for an invitation that has the wrong email or role.
- Select Remove.
- Create a replacement invitation with the corrected values.
The removal of a pending invite is immediate and has no confirmation step. It affects only the invitation. It does not remove a person who already accepted.
Another invite to the same email and team updates the current pending invitation. It does not create a duplicate.
4. Have the Recipient Accept
Ask the recipient to sign in with the invited email. Then ask them to open the team selector or Settings → Account → Teams.
They can choose:
- Accept to join with the assigned role
- Decline to remove the invitation
Acceptance consumes the invitation and creates team membership. Eigenn restricts acceptance to the authenticated email. If you forward the invite, it does not transfer access to another account.
The pending list has no visible expiry or resend action. If the invitation does not arrive, check the email. Then remove the row and send a new invitation.
5. Confirm Membership
After acceptance:
- Refresh Settings → Members.
- Search by the person's display name.
- Confirm the email and role.
- Ask the person to switch to the team.
- Ask them to check a read or write action that is correct for their role.
The member search now filters by display name and not by email. If an email search returns no row, search the person's name or scan the list.
6. Change a Role
Only an Owner can change roles.
- Find the member.
- Open the role selector.
- Choose Owner or Member.
- Wait for the list to refresh.
- Check the new role.
The current selector does not offer Viewer. A current Viewer membership stays read-only. To change a person to or from Viewer, you need a supported administrative path outside this screen.
Transfer practical ownership
- Promote the new responsible person to Owner.
- Confirm that they can open team Settings.
- Confirm that they understand the billing and security responsibilities.
- Demote the previous Owner to Member when this is correct.
- Recheck that at least one Owner remains.
Role changes are immediate. They do not need approval from the affected person.
7. Remove a Member
Only an Owner can remove another member.
- Confirm the team and member identity.
- Check if the member is an Owner.
- Transfer any operational ownership before removal.
- Open the member's action menu.
- Select Remove Member.
- Confirm the dialog.
- Refresh the list.
- Confirm that the member is gone.
Removal revokes this team's membership. It does not delete the user's account, their work history, or memberships in other teams.
8. Leave a Team
Open Settings → Account → Teams or use your own row under Settings → Members.
- Choose Leave Team.
- Read the warning.
- Confirm the action.
After you leave, you need a new invitation to get access again. If the team was active, Eigenn clears that active-team selection.
The last Owner cannot leave. Promote another person to Owner first. Check the promotion before you try again.
9. Switch or Manage Another Team
Open Settings → Account → Teams.
- Select View to switch the active workspace and open its overview.
- If you are an Owner, select Manage to switch the workspace and open its Settings.
Always wait for the workspace switch to finish before you change members or data. The page can show many teams. But write operations apply to the active team context.
10. Check Enterprise Organization Access
Normal team role management happens under Members. Eigenn keeps the enterprise domain and SSO details under Settings → Account → Organizations. Only the recorded organization owner can see them.
Eigenn does not automatically list an account with the team role Owner as the recorded organization owner. If the organization does not appear, manage membership in Teams. Then ask the recorded owner to manage the domain or the SSO setup.
When provider-backed admin links are available, they open an external portal for domain verification and SSO. Do not share those session links in place of the correct team role.
Behavior specification
Access Review Checklist
- The active team is correct.
- Every Owner still needs full administrative control.
- At least one trusted Owner remains.
- Members have write access only where they need it.
- Current Viewers are still correct for read-only access.
- Pending invitations use exact sign-in emails.
- No stale or mistaken invitations remain.
- You removed departed people from the membership.
- The recorded organization owner manages the enterprise identity access.
Troubleshoot
Send invites fails for an Owner role
Only a current Owner can invite another Owner. If you are a Member, send a Member invitation or ask an Owner.
Send invites fails even for a Member role
Confirm that you are not a Viewer and that the correct team is active. Viewers can read the member page but cannot write.
The recipient cannot see or accept the invite
Compare the invite email with the authenticated account email exactly. Remove and recreate the invite if the address or capitalization is wrong.
The invitation email did not arrive
Check the pending row first. If it exists, remove it and send a new invite. There is no resend control in the current interface.
I cannot find a member by email
Search their display name. The table shows the email, but the current member-table filter does not use it.
I cannot select Viewer
The current visible role selector offers only Owner and Member. Current Viewer access stays read-only. But the screen does not give Viewer assignment.
I cannot demote myself
If you are the only Owner, promote another trusted member first. Self-demotion becomes available only when another Owner remains.
I cannot leave
The final Owner cannot leave. Assign another Owner. Check the role change before you try again.
A removed member still appears active elsewhere
Refresh the member list and confirm the correct team. Removal affects this team only. The person's user account and other team memberships stay valid.
Diagrams
Rendering diagram…
Screenshots
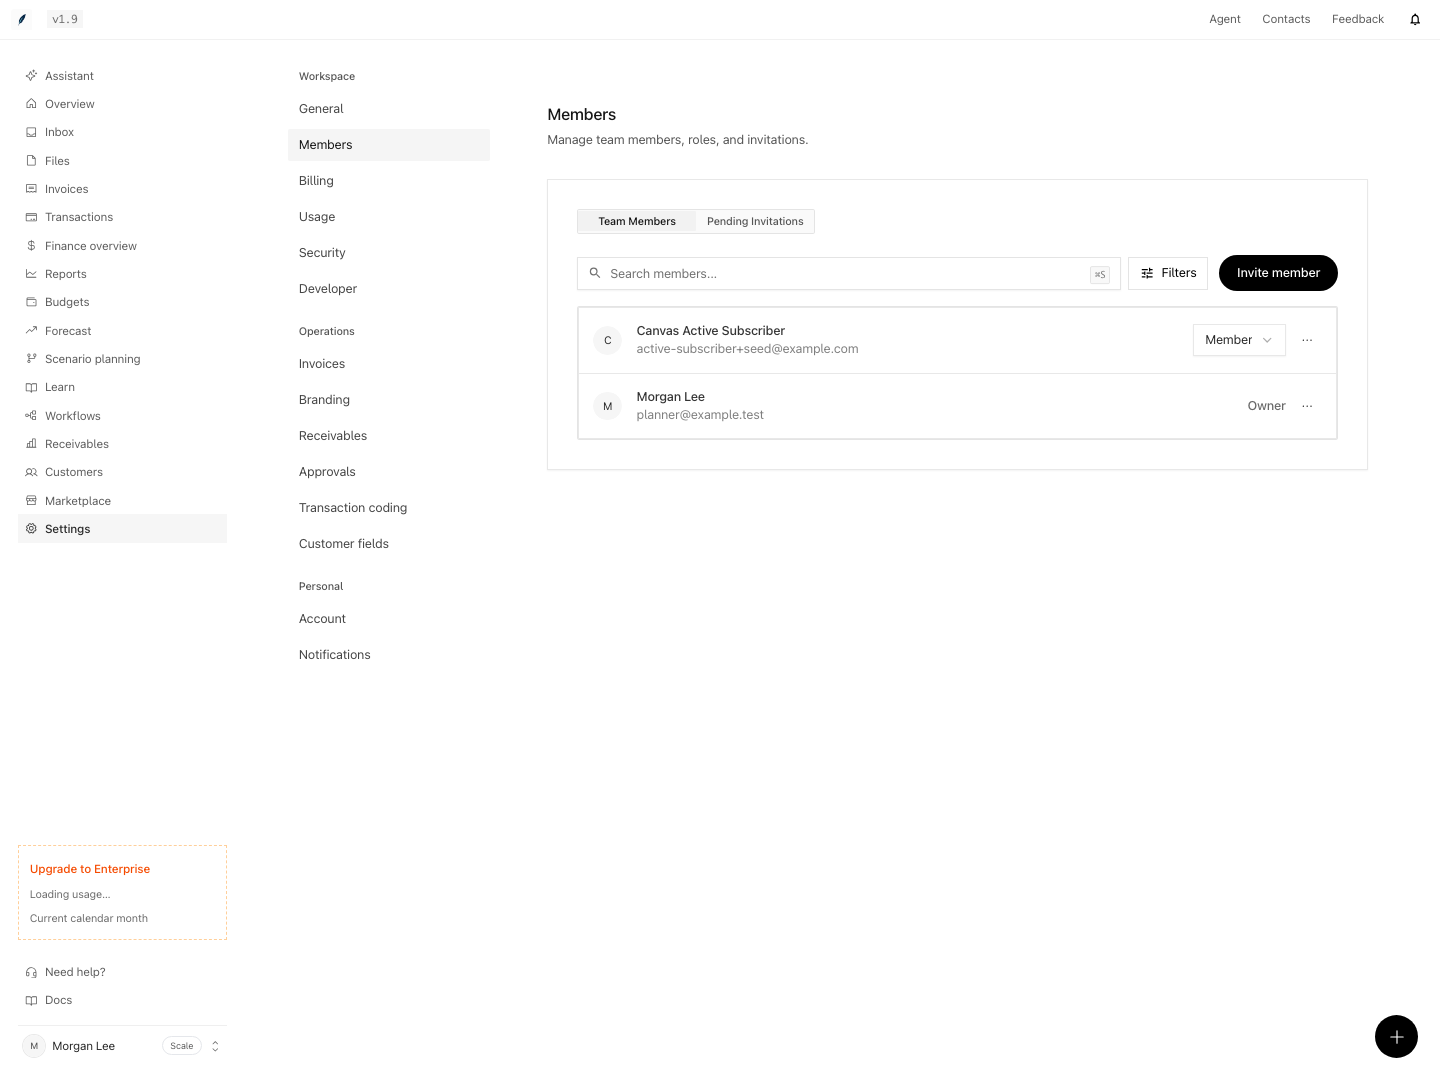
Shown with synthetic data in a local workspace.
Verification
- Open Settings → Members and confirm the team and your role are correct (expected: your role is shown accurately).
- Search for Owners, confirming at least one trusted Owner remains (expected: at least one Owner listed).
- Invite a new member using their exact sign-in email (expected: invitation sends, pending invite appears with correct role).
- Remove a pending invite and send a new one (expected: old invite disappears, new one appears for same email).
- Ask the recipient to accept (expected: status changes from pending to active member; correct role shown).
- Change a member’s role (expected: role updates instantly on the member list; only Owners can do this).
- Remove a member (expected: member no longer appears in team; their access gone for this team only).
- Attempt to leave as the last Owner (expected: refused, instruction to assign new Owner).
- Search members by display name and verify role (expected: filter works by name, not by email).
- Review member and invitation lists match your organization's intended access control (expected: all members have needed and appropriate roles, no stale invites remain).
Related
Related Pages
Manage Security and Billing
Run an owner review of MFA policy, audit logging, access boundaries, subscription state, usage, and destructive controls.
Manage the Invoice Lifecycle
Move invoices through the draft, scheduled, unpaid, overdue, paid, and canceled states, and keep the payment and communication context.