Create and Send Invoices
Build an accurate invoice, confirm its customer experience, and select how to finalize, email, or schedule it.
Summary
Eigenn separates the edit stage from the delivery stage. You can therefore review the invoice before it becomes an active receivable. The form autosaves draft work. The final delivery action decides one of three results. Eigenn finalizes the invoice without email, finalizes and emails it, or schedules it for later delivery.
Capabilities
Eigenn enables you to draft invoices with customizable details, products, and customers. You can preview, autosave, and finalize invoices, with options to send them via email, schedule future delivery, or simply save them as finalized records. Drafts are protected by validation checks, and invoices can include currency, tax, legal, and product data for reporting.
Prerequisites
Before You Start
- Sign in and select the team that issues the invoice.
- Review Settings → Invoices for the defaults: invoice numbers, payment terms, tax strategy, reminders, PDF attachment, currency, memo, and footer.
- Have the customer's name and billing email ready. You can select a customer that exists, or create one from the invoice form.
- Create reusable items under Invoices → Products if product usage and revenue attribution are important.
- Confirm the payment instructions, tax treatment, and legal details that your business needs.
Concepts
An invoice can be a draft, finalized as unpaid, or scheduled for future delivery. Email delivery is tracked separately from its payment status. The editing stage is distinct from delivery: you can preview and autosave drafts before choosing a delivery action. Products may be selected from a catalog for reporting or entered as custom lines. Currency choice affects product selection and item validity. Delivery actions control when and how invoices reach customers and update their status.
Workflow
Choose a Creation Experience
- Open Invoices → Invoices.
- Select one of the create controls:
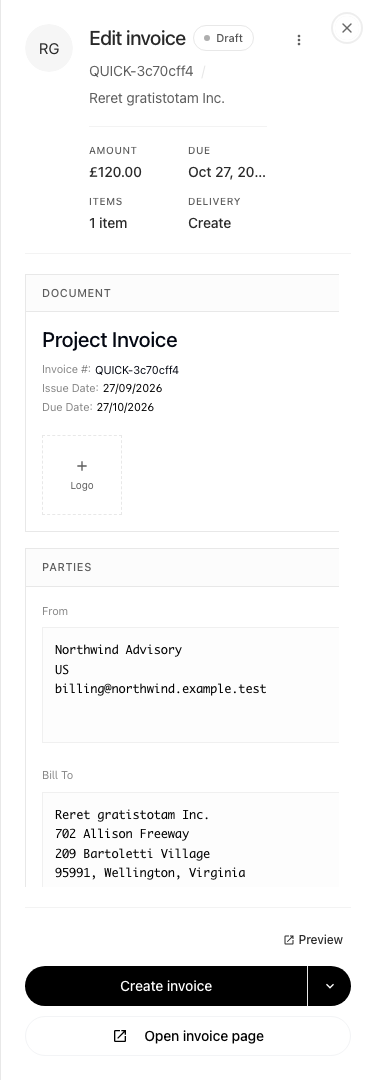
- Quick create invoice opens the invoice form in a sheet. You stay on the list.
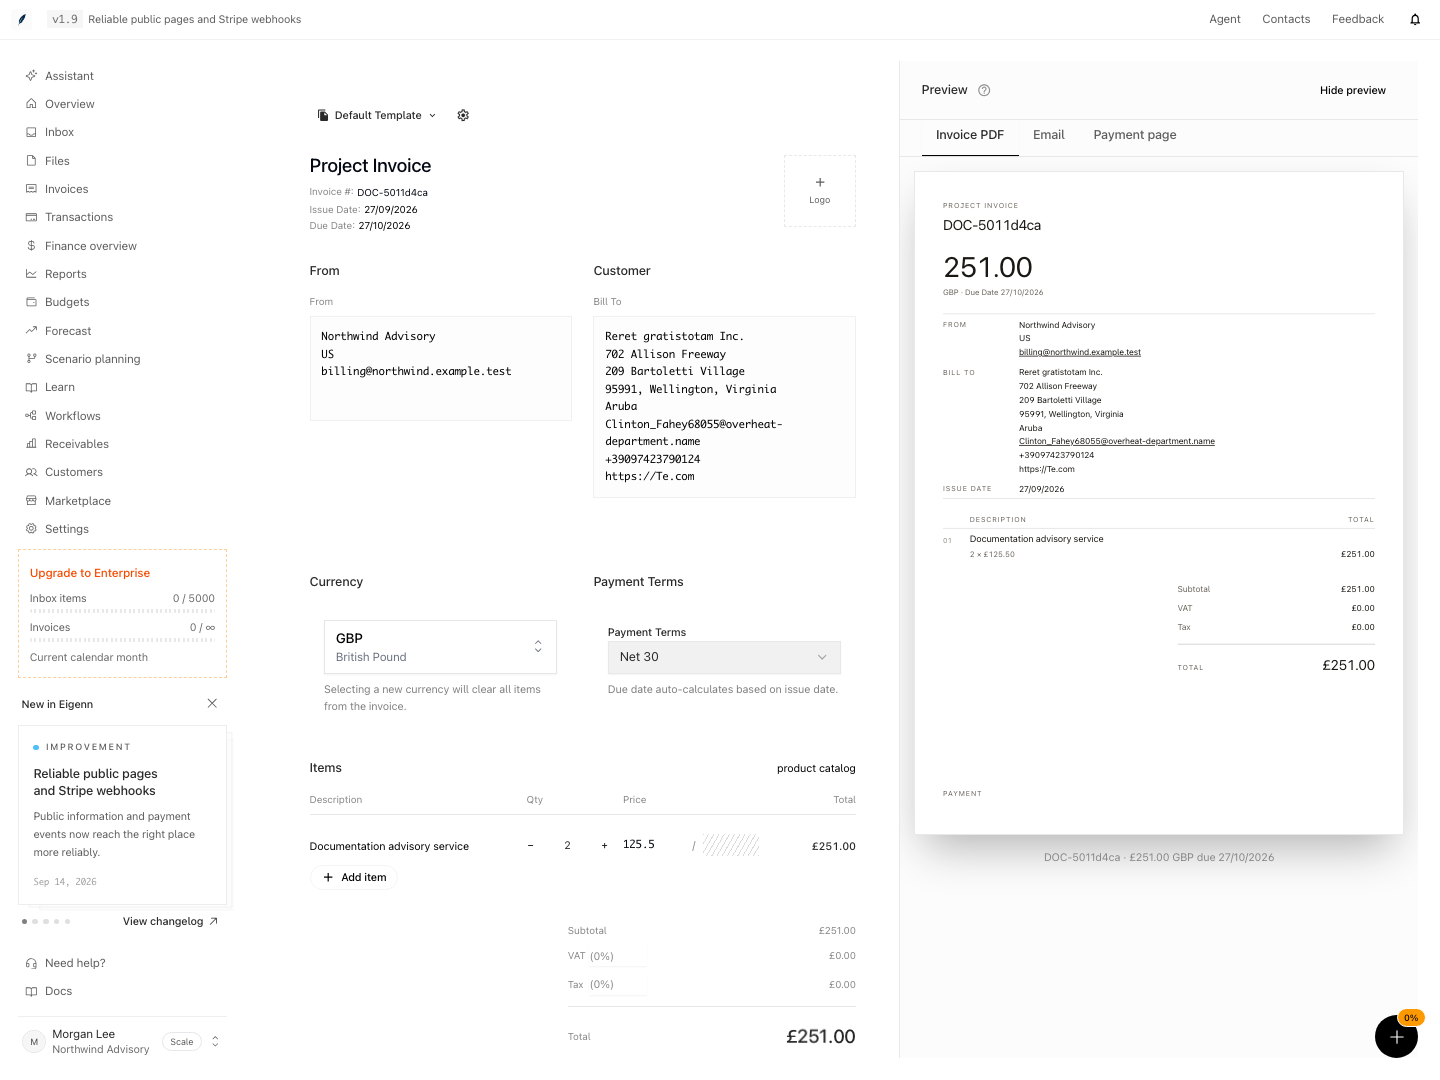
- Create invoice with preview opens the full-page form with a side-by-side preview on larger screens.
The quick-create sheet waits for invoice settings before showing editable fields. When reopening an existing invoice, it also waits for that invoice’s saved contents.
Use quick create for routine invoices. Use the full-page form if you must see the document and the email presentation together when you change the invoice.
1. Select or Create the Customer
- In Customer, select Select customer.
- Wait for the customer list, then search and select the correct record. If there are no matches, keep the search open to try another name or explicitly choose Create customer.
- If the customer does not exist, select Create customer.
- Complete the customer record.
- Select the new customer in the invoice.
- Confirm the customer name, billing address, and email that the invoice shows.
The invoice must have a customer before it can autosave and finalize. Create & send also needs a usable customer email for successful delivery.
2. Confirm Invoice Identity and Dates
Review the invoice header fields:
- Template
- Invoice number
- Issue date
- Due date
- Sender details
- Logo
Invoice numbers must be unique in the team. Eigenn rejects a draft save if another invoice already uses that number. Correct the number and confirm that the draft saves before finalizing it.
Select Payment Terms: Due on receipt, Net 15, Net 30, or Net 60. Eigenn recalculates the due date from the issue date.
3. Set the Currency Before You Add Items
- Select the invoice currency.
- Confirm that it agrees with the customer's agreement.
- Confirm that it agrees with any catalog products that you plan to use.
- Add items only after the currency is final.
When you change the currency, Eigenn clears every line item. This behavior stops the silent reuse of values from one currency in another currency. But it also means that you must enter unsaved line-item changes again.
4. Add Line Items
For each item:
- Select the description field.
- Select an active catalog product, or enter a custom line-item name.
- Enter the quantity.
- Confirm the price and unit.
- Enter line-item tax when the template shows that column.
- Select Add item for another line.
- Reorder or delete rows when necessary.
When you select a product suggestion, Eigenn fills its saved name, price, and unit. Eigenn also links the line to product reporting. Suggestions show only active products that match the invoice currency. A custom line that you enter stays valid. But Eigenn cannot guarantee that this line contributes to product usage, MRR, ARR, or revenue reporting.
A product can offer variant suggestions with SKU and variant price, or a bundle with saved component details. Tracked variants at zero stock cannot be selected. Check the chosen variant or bundle, then review quantity and final price; selection does not itself reserve inventory. See Invoice Products for catalog setup.
5. Review Totals and Payment Details
Confirm the subtotal, discount, tax, VAT, and total that the form shows. Then review:
- Payment collection choice
- Payment instructions
- Notes for the customer
- Footer
- Custom fields such as a purchase order or project code
- Tax ID and VAT presentation
- QR code and PDF attachment options
- PDF page size
The form shows Request payment and Autocharge customer. In the current form, selecting Autocharge customer selects the Create & send delivery action; it does not itself charge a saved payment method. Review the final Delivery action before submitting and confirm payment separately in the invoice or provider records.
6. Confirm the Preview
In the full-page form on a large screen:
- Open Invoice PDF.
- Examine the document.
- Open Email.
- Confirm the message that the customer gets.
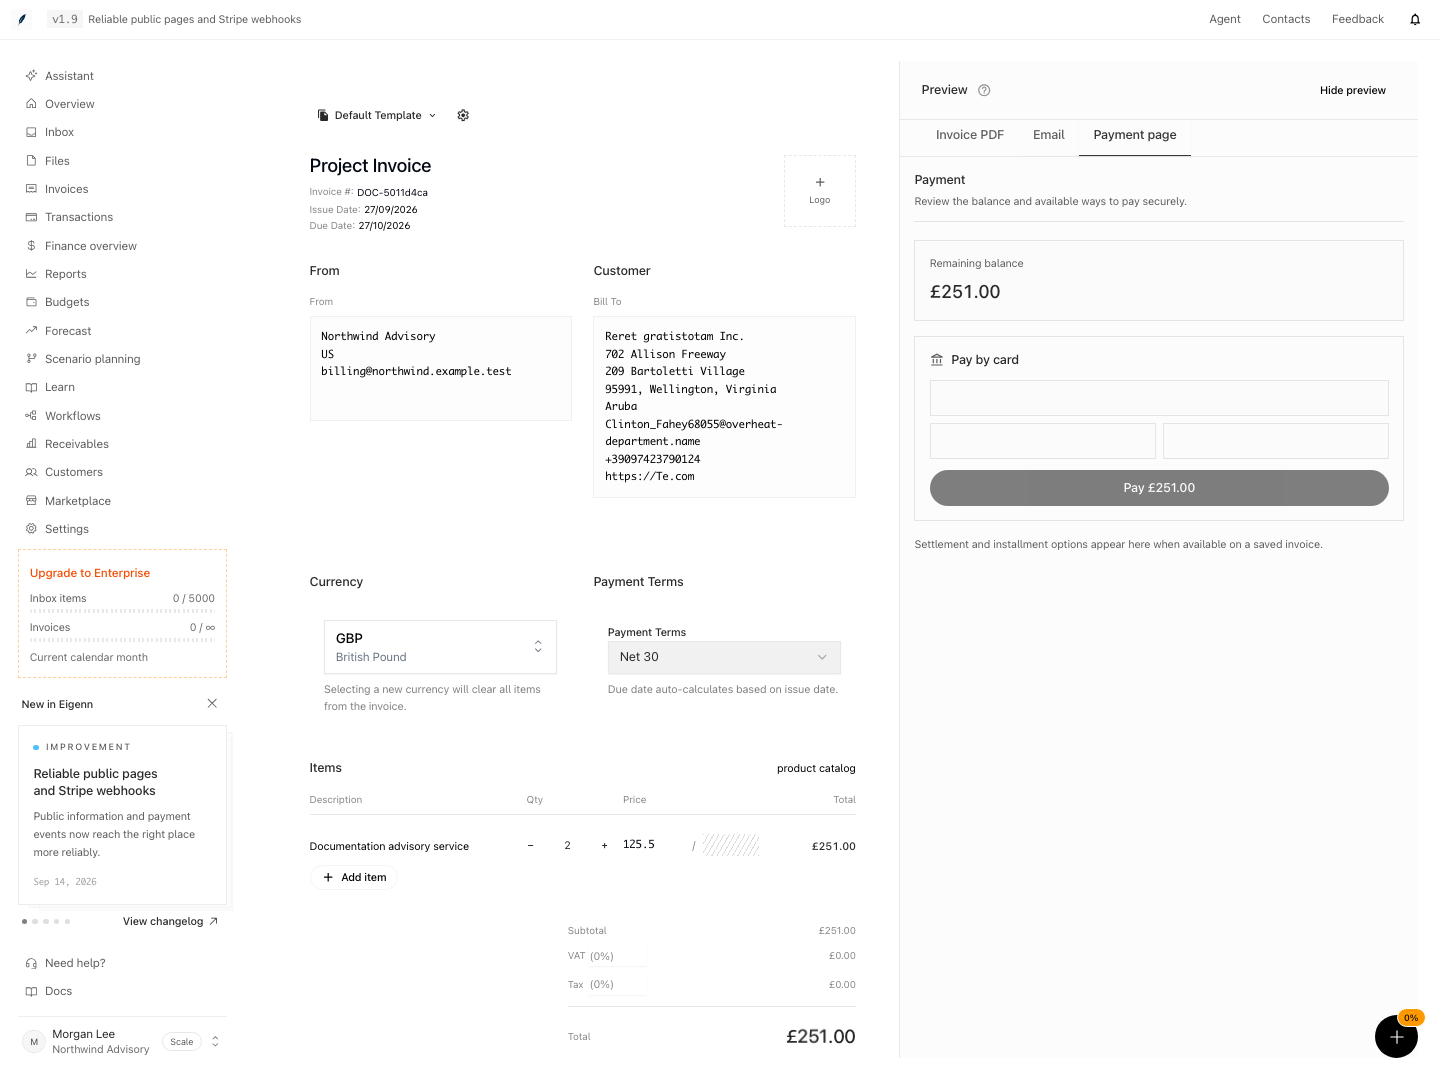
- Open Payment page to review the remaining balance and the card-payment layout.
- Select Preview invoice to open the invoice as the customer sees it.
Preview invoice becomes available only after the draft has a shareable token. The PDF and email views update when you make a change. The Payment page tab shows a preview with disabled card fields and a disabled Pay button. It does not collect a payment; the saved invoice determines which payment options are available to the customer. On smaller screens, the form hides the side preview. If you select Hide preview, the current full-page form does not show a control that restores it. Open or refresh the form again to show the preview.
7. Confirm the Draft Save
After you change the form and select a customer, look at the footer for:
- Saving... when Eigenn stores the draft
- Edited ... ago after a successful draft save
- Preview invoice when a public token is available
The quick-create sheet uses Autosaving changes while saving and labels its invoice link Preview. After its first save, the sheet changes to Edit invoice and the page URL identifies the saved draft. Reloading that URL restores the saved customer, line items, and amounts.
Eigenn waits a short time after your changes before it saves the draft. A draft save also needs a selected customer and a valid invoice number. Do not close the page when Saving... is visible.
8. Choose the Delivery Action
Open Choose invoice delivery action. Then select one action:
| Delivery action | Result |
|---|---|
| Create invoice | Finalizes the draft as Unpaid. Eigenn does not email the customer as part of this action |
| Create & send | Finalizes the draft as Unpaid and queues document generation and customer email |
| Schedule | Keeps a future delivery job and records the invoice as Scheduled |
For Schedule:
- Select a future date.
- Enter a future Send time.
- Resolve Schedule time must be in the future if it appears.
- Select the scheduled submit button.
When you press Enter in the form, Eigenn does not submit the invoice. Select the primary action button after the form becomes valid.
9. Confirm the Result
After you submit the invoice, the full-page form opens the invoice record. Quick create shows a success sheet. Open the saved invoice and check:
- Invoice number, customer, currency, and total
- The expected Unpaid or Scheduled status
- Issue, due, sent, or scheduled dates
- Invoice link
- Line items and payment instructions
- Activity and communication history
- PDF availability for a finalized invoice
For Create & send, Eigenn generates the document and sends the email after it finalizes the invoice. The invoice can show Unpaid before its sent date or its activity appears. Wait for the delivery event. Do not submit the form again.
For Schedule, confirm Scheduled at. Then open Invoices → Invoices → Scheduled and confirm that the record is in the scheduled queue. To cancel delivery, open Actions for invoice [number] in the list and select Cancel schedule. The invoice returns to Draft, its scheduled time is cleared, and its saved line items remain available.
Behavior specification
Statuses and Important Edge Cases
- Autosave can create a Draft before you select the final delivery action.
- Create invoice does not leave the record in draft. It moves the record to Unpaid and does not send an email.
- Create & send also moves the invoice to Unpaid when Eigenn processes the delivery.
- Schedule needs a future date and time. It moves the invoice to Scheduled.
- If you cancel a scheduled send later, Eigenn returns the invoice to Draft.
- If you change a scheduled delivery to an immediate action, Eigenn replaces the pending schedule.
- The form can stay disabled when the customer, invoice number, line-item name, or schedule is invalid.
- Product suggestions can disappear when the invoice currency and the product currency are different.
- A shareable invoice link is sensitive customer billing information. Send it only to the intended recipients.
Diagrams
Rendering diagram…
Screenshots
Verification
Troubleshoot
The sheet shows Unable to load invoice
Close the sheet and open it again after the connection recovers. Eigenn keeps the editor unavailable until it can load the invoice details and settings, so a failed load cannot silently replace your edits with defaults.
The submit button is not available
Confirm that the invoice has a customer, a unique invoice number, at least one named line item, and valid dates. Correct any visible field error. For scheduled delivery, confirm that the date and the time are still in the future.
The draft does not show Saving or Preview invoice
Make a change, select a customer, and correct any invoice-number error. Eigenn starts a draft save only after the necessary context is valid. Eigenn also pauses for a short time when you enter text.
A currency change removed my items
Eigenn clears the items by design. Set the currency first. Then enter the items again in the new currency and recalculate the totals.
A catalog product does not appear
Open Invoices → Products and confirm that the product is active. Confirm that it uses the same currency as the invoice. Then return to the item field and search again.
The customer was not emailed
Confirm that you selected Create & send. Confirm that the customer record has the correct email. Confirm that the invoice activity shows a send event. If Eigenn created the invoice without a send, review the current status first. Then use a supported send or reminder action.
The invoice number already exists
Use a different number, or let the team's strategy for invoice numbers supply the next number. Do not use the same number again for another invoice in the same team.
The scheduled invoice did not send
Open Invoices → Invoices → Scheduled and confirm that the invoice still has a future Scheduled at value. If the invoice returned to draft, someone canceled the schedule. If the scheduled time passed and no delivery activity appeared, review the invoice record first. This review stops a duplicate delivery when you schedule the invoice again.
The customer payment page preview is not interactive
The form's Payment page tab displays the balance and payment layout with disabled controls. Use the saved invoice link to review the customer's available payment options. Previewing the form does not charge the customer.
- Create a new invoice and attempt to submit without selecting a customer; the form should prevent submission.
- Enter a duplicate invoice number; the system should show an error and block finalization.
- Change currency after adding items; items should be cleared automatically.
- Schedule an invoice for a future time and confirm it appears in the Scheduled queue after submission.
- Use 'Create & send'—after processing, the invoice status should be Unpaid, and the activity log should show a sent event.
- Attempt to select a product in a different currency from the invoice; it should not appear in suggestions.
- Review the PDF and email previews after editing; confirm that the updated content appears.
- Cancel a scheduled invoice and confirm status returns to Draft.
- Open invoice details after delivery action and check for correct totals, payment instructions, and document availability.